


Lorem ipsum dolor sit amet, consectetur adipiscing elit. Ut elit tellus, luctus nec ullamcorper mattis, pulvinar dapibus leo.

Reach-in closets are in most homes. They’re built for storage and function, but they don’t have to be boring. That’s my north star. I don’t just want more capacity; I want a closet that works fast in the morning, stays tidy with minimal effort, and looks intentional when the doors are open—or when there are no doors at all.
Here’s the mindset. First, treat your reach-in like a tiny room with a job. Give the “room” good lighting, durable finishes, and a layout that fits your wardrobe, not an imaginary one. Second, make every inch earn its keep—wall-to-wall and floor-to-ceiling. Third, design for frictionless habits (easy to put away = stays organized). Finally, don’t underestimate aesthetics: a closet that looks finished invites better upkeep.
From experience, small design moves can pull heavy weight. I routinely “Install a closet organizer” to add adjustable shelves, drawers, and rods—DIY or pre-built, your call. When I want impact, I’ll “Go color-drenched”: paint the interior, trim, and shelves in one rich, moody hue for a clean, modern look. Sometimes I simply “Paint the interior”—a bold interior (even black) adds depth and makes clothes and accessories pop without touching the rest of the room. And if storage needs change? I’ll reconfigure rods and swap in drawer stacks without ripping anything out.
By the end of this guide you’ll know what to measure, how to choose a layout, when to go DIY vs. custom, which doors make space feel bigger, how to light without hardwiring, where drawers and accessories actually pay off, how to solve weird corners, and when it’s worth repurposing the closet completely (think closet office or a stealth laundry zone). Let’s build a small closet that punches way above its size.
If you measure once and design twice, the rest is easy. Grab a tape, notepad, and your phone for photos.
Measure these first:
Width: inside jamb to jamb. Note any returns (short walls behind the door track) that steal usable width.
Height: floor to ceiling and to any soffit or shelf.
Depth: wall to inside of door/track (not the trim). Most reach-ins are around 24 in. deep; that’s the magic number because a standard hanger + garment needs ~22 in. Avoid installing rods in anything shallower than ~22 in—shoulders will crash into doors.
Door opening: width of each leaf/panel and how much of the closet it blocks.
Obstacles: outlets, baseboard heaters, attic hatches, sloped ceilings.
Human-scaled heights that rarely fail:
Single hang: rod center ~66–68 in from the floor. Leave 2–4 in above the rod for hangers to tilt comfortably.
Double hang: lower rod ~40–42 in; upper rod ~80–82 in. Aim for ~38–40 in of vertical for shirts/skirts; ~60–62 in for dresses/coats in a long-hang bay.
Shelves: 12–14 in deep for folded stacks; 10–12 in vertical between shelves for tees/denim; bump to 14–16 in for bulky sweaters.
Shoe shelves: 7–8 in vertical for flats/sneakers, 9–10 in for heels/ankle boots; 12+ in for tall boots (lay them if needed).
Drawer stacks: standard 14–16 in deep drawers work beautifully in reach-ins; bottom of top drawer ~36 in high feels ergonomic.
Pro tips from the tape session:
If your depth is 24 in but you have a thick door track, subtract it from usable depth. That’s why sliding-door reach-ins sometimes feel tight.
Sketch the interior and the door swing/overlap—space math matters.
Take inventory. Count how many inches of hang you truly need and how many linear feet of shelves will replace your chair-pile.
All the “wow” projects nail these basics first. Everything else is just parts and paint.
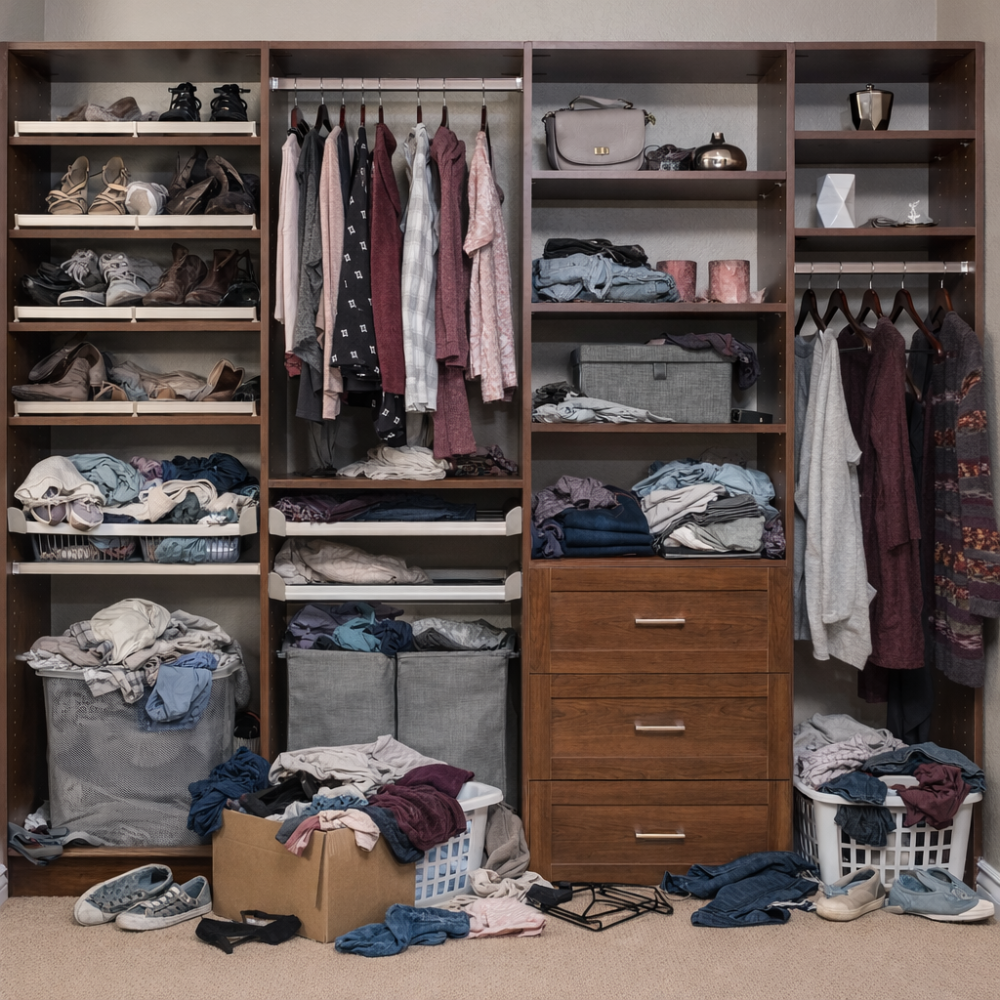
Layout is your power move. The right combo of rods, shelves, and drawers multiplies capacity without making the closet chaotic.
Classic frameworks that win:
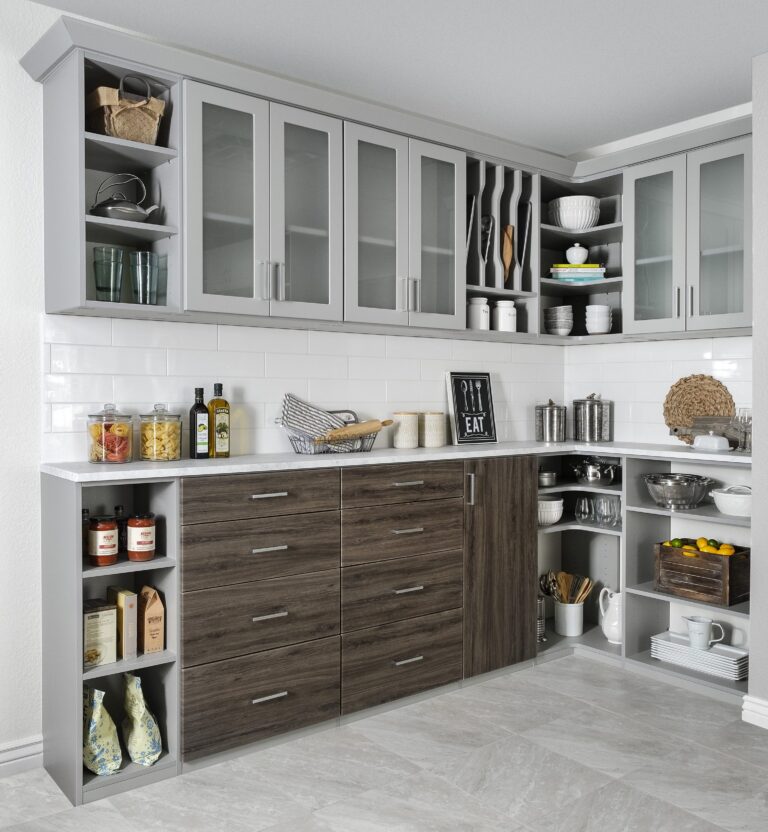
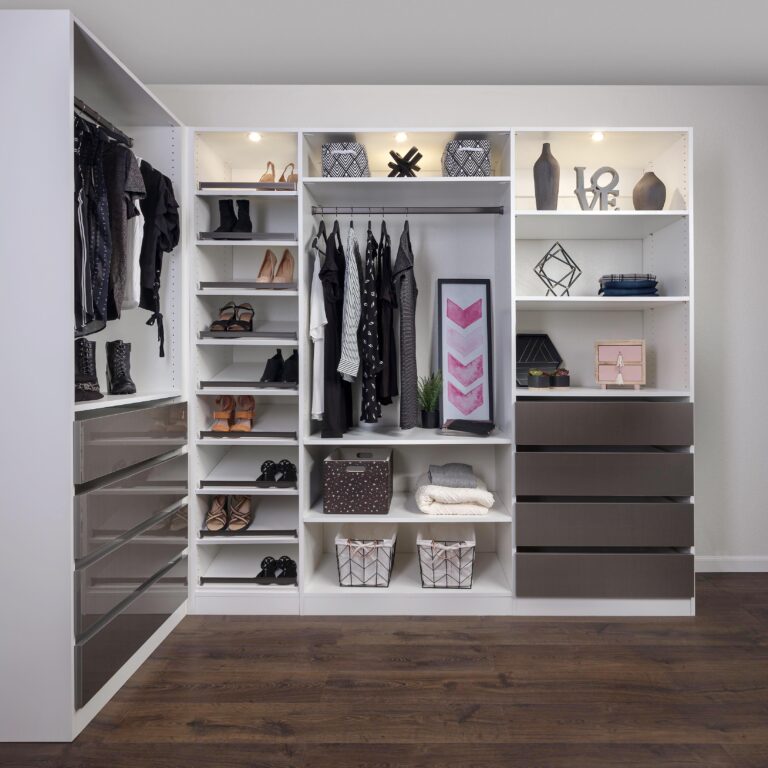
Double-hang + shelf stack: My default for most wardrobes. Two rods on one side for shirts/skirts/pants (folded over hangers) and a drawer stack plus adjustable shelves on the other. I like to “Install built-in drawers” inside the closet to control small items and keep the floor clear while adding a custom look.
Single-hang + long-hang bay: Keep one section at full height for dresses, coats, or garment bags. Above long-hang, add a high shelf for off-season bins.
All-shelf library: If hanging space isn’t critical, “Add floating shelves … to use every inch from wall to wall and floor to ceiling.” This turns awkward reach-ins into perfectly gridded storage for shoes, baskets, and folded items.
How I place pieces:
Drawer stack centered or offset where doors open widest. Drawers that can open fully are used the most.
Shoe zone at eye level, not the floor. You’ll actually maintain it.
Baskets up high for off-season gear. I “Use attractive bins”—woven or fabric, labeled, and color-coordinated—because pretty containers get used (and returned to) more.
Accessory rails (belts/scarves) on returns or inside panels where nothing else fits.
Avoid these traps:
Too many shallow shelves; they look neat but create over-stuffed stacks you won’t fold properly.
Long runs of single hang when 70% of modern wardrobes is short hang.
Dead floor corners. Drawer stacks or vertical shoe towers eat that space efficiently.
Think in modules, not in chaos. Build bays that match your inventory, then fine-tune with adjustable shelves as your wardrobe changes.
You can get 80% of the benefit with a smart modular system—or go fully custom if your walls are quirky or you want furniture-grade finishes.
DIY / modular (budget-friendly, fastest):
What it is: Pre-configured uprights, rods, shelves, and drawers you cut or snap to size.
Best for: Standard widths, straight walls, renters (some systems are wall-mounted and patchable).
Pros: Lower cost, weekend-friendly install, easy to modify later.
Cons: Limited colors/depths; exposed hardware; drawers aren’t always soft-close.
Tip: “Install a closet organizer … DIY or pre-built, your call.” If you’re doing it yourself, pre-paint the back wall and install a level ledger to keep uprights dead-straight.
Semi-custom (sweet spot):
What it is: Cut-to-fit panels, decent hardware, real drawers, better color choices.
Best for: Non-standard widths, door returns, small notches, sloped ceilings.
Pros: Looks built-in, flexible accessories, strong weight ratings.
Cons: Mid-tier price, lead times, simple DIY if you’re handy (or pay for install).
Fully custom (premium, problem-solver):
What it is: Designed-to-the-millimeter cabinetry, scribed to wavy walls.
Best for: High-end finishes, integrated lighting, tricky corners, or when the closet is part of a suite design.
Pros: Perfect fit, furniture feel, hidden hardware.
Cons: Highest cost, requires pro install, less flexible after.
Material choices that hold up:
Melamine for durability and price; plywood for strength and repairability; painted MDF for seamless fronts (keep humidity in check).
My rule: if the closet is a simple 5–8 ft straight run, modular is excellent. If you’re battling pipes, soffits, or an off-center opening, semi-custom pays for itself in sanity.
Your doors decide how much of the closet you can reach at once and how easy it is to put things away. Don’t ignore them.
Swing (hinged) doors
Pros: Full access to the opening; mirrors easily added; best ventilation.
Cons: Needs floor space for the arc; can hit furniture.
Use when: Room has clearance and you want maximum visibility.
Sliding doors
Pros: Great in tight rooms; no swing clearance.
Cons: Always block half the closet; tracks steal a bit of depth. Mind hanger-shoulder rub.
Use when: Bed or desk sits close to the closet.
Bi-fold doors
Pros: Wide access with less swing; inexpensive.
Cons: Center gap; can feel flimsy if hardware is cheap.
Use when: You need width but can spare a little forward clearance.
Pocket doors
Pros: Zero swing; full opening.
Cons: Requires wall cavity; tougher retrofit; watch for wiring/plumbing.
Use when: Renovating or building new.
If your panels are builder-basic, “Swap the doors”: go wood plank, mirrored, French, sliding, or pocket doors for an instant upgrade. Or “Go doorless” to make a small room feel larger—just treat the interior like part of the room’s design and keep it tidy. Doorless works best when you’ve committed to finished paint, coordinated bins, and clean sightlines.
Space math reminder: a 24–30 in swing door wants roughly that much clear floor depth; sliding saves that but costs you simultaneous access. Choose based on how you use the closet: fast daily access favors swing/bi-fold; tight rooms love sliding/pocket.
Lighting is the highest-ROI upgrade in a reach-in. If you’ve ever dressed in the dark, you know.
I like to “Improve the lighting” with plug-in or battery-powered strips, pucks, or motion lights. Better lighting = faster mornings. Here’s how to place it:
LED strip at the front (under the header or along the face frame) aimed back at clothes. This eliminates shadowed rods.
Puck lights under shelves over drawers and shoe bays for punchy task light.
Motion sensors so the closet lights up as you open the door—no switches to fumble.
Color temperature: 3000–3500K is flattering for skin and fabric colors. Stay consistent.
Diffusers: Use channel diffusers on strips to avoid LED dotting on glossy paint.
If you can’t run cords, battery bars with USB-C charging are excellent. Mount them with metal plates so you can pop them off to charge. In rentals, 3M VHB + cable clips make clean installs. For a higher-end look, conceal wiring in grommeted holes behind uprights or along vertical panels. And if you’re repainting anyway, run a shallow paintable raceway to hide the cord path.
Lighting transforms the closet from a dark cavity into a boutique display. You’ll see more, use more, and maintain better.
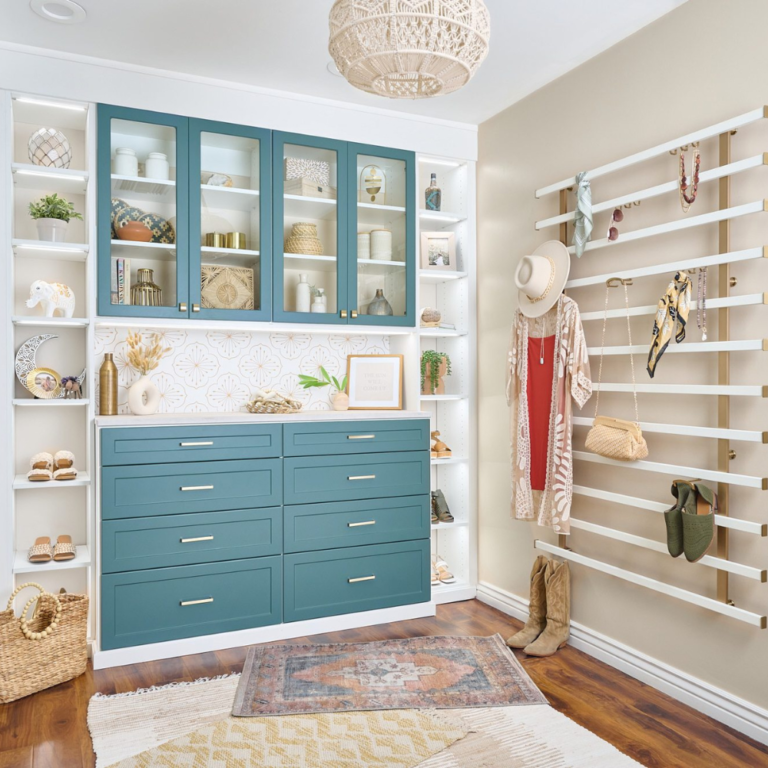
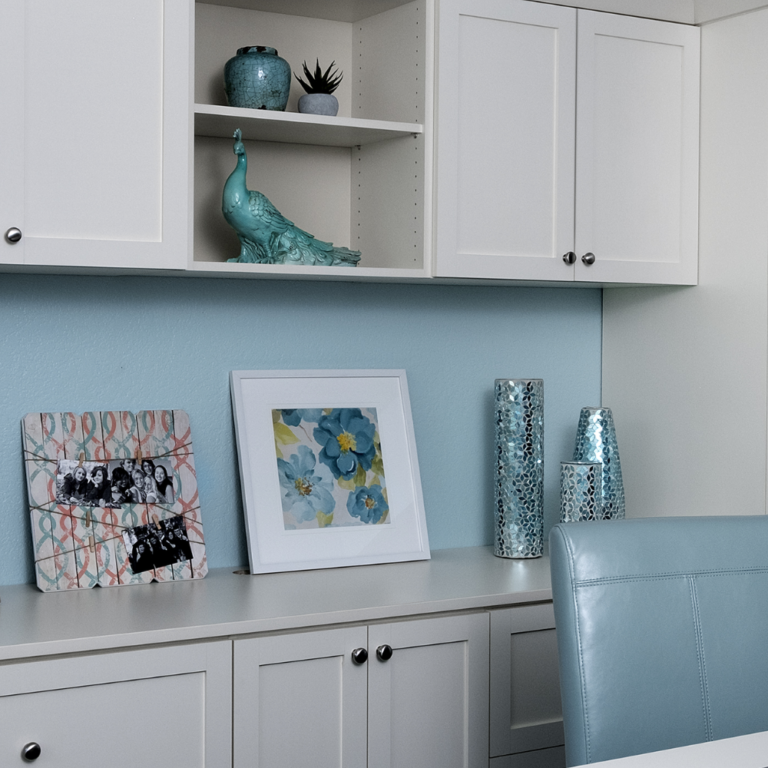
Atmosphere matters. I often “Go color-drenched”—paint the closet interior, trim, and shelves in one rich, moody hue for a clean, modern look. It visually unifies the parts and minimizes visual noise. On bolder projects, I’ll “Paint the interior”: a bold interior (even black) adds depth and makes clothes and accessories pop without touching the rest of the room.
If paint isn’t your thing, “Add wallpaper”: line the back wall with a fun pattern and paint shelves to coordinate for a polished, designer feel. Wallpaper in a reach-in is low commitment and high reward—you only need a roll or two, and the pattern turns the closet into a designed vignette.
Execution tips:
Satin or semi-gloss on shelves for wipeability; eggshell on walls.
Caulk and fill all fasteners before paint for a built-in look.
If you’re installing a system, pre-paint the walls; then color-match the shelves or leave them crisp white for contrast.
For wallpaper, seal raw MDF edges on shelves so paint sits smooth and doesn’t fuzz.
These visual upgrades aren’t fluff. When a closet looks intentional, you’ll keep it tidy. That’s why I lean into finishes as hard as I lean into layout.
Drawers inside a reach-in are controversial—some say they steal hang. Done right, they supercharge usability. I routinely “Install built-in drawers … to control small items and keep the floor clear while adding a custom look.” Here’s my approach:
3–4 drawer stack (6–8 in top drawers for socks/tees, 10–12 in bottom drawers for knits/bags). Put this where doors open widest.
Shelf-over-drawers with dividers for clutches and hats.
Pull-out trays for jewelry or sunglasses; these are shallow but game-changing.
Baskets for soft categories—“Use attractive bins … label them and keep colors consistent for a cleaner look.” Woven or fabric beats clear plastic for style; labels beat memory for maintenance.
Vertical accessories: valet rod, tie/belt pull-outs, purse hooks on side panels.
Accessories are only helpful if they reduce steps. A hamper behind a drawer front (vented) beats a basket on the floor. A valet rod by the opening supports next-day outfits. A sliding shoe shelf at hip height gets used; a pile under hanging does not.
The floor is not storage. When drawers and bins absorb the small stuff, the floor stays empty—and the whole closet reads calm.
Not all reach-ins are friendly rectangles. Deep corners and tight returns can swallow space.
Deep corner > 28–30 in: Consider front-to-back hanging on a short rod so shoulders don’t block the adjacent bay. It’s perfect for occasional wears (formal coats, garment bags).
Narrow openings with wide interiors: Place the drawer stack dead-center of the accessible zone; stash long-term storage on the hard-to-reach ends.
Sloped ceilings / soffits: Put shelves under the slope; park long-hang where height peaks.
Weird returns: Use them for vertical shoe towers or pull-outs; avoid swinging drawers into returns that block opening.
If hanging isn’t critical, “Add floating shelves … to use every inch from wall to wall and floor to ceiling.” In very shallow niches, 10–11 in deep shelves support shoes and clutches beautifully. For stability, use cleats along the back and sides; finish edges for a furniture vibe.
Hardware matters more in odd spaces. Level, anchored uprights make everything else feel intentional—even if the walls aren’t. Shims and patience are your friends.
Sometimes maximizing reach means changing the job entirely. If you can spare the storage, “Create a closet office”: remove the rods, add a desk and overhead light, then finish with paint or wallpaper for a compact work nook. Center a desktop on cleats or use a shallow worktop with a cable grommet; mount a plug-in sconce or a battery task light; a slim file drawer keeps it legit. Shut the doors and your work disappears.
Have a second reach-in near plumbing? “Sneak in a laundry zone”: tuck in a slim washer and dryer (or a stackable unit), add ventilation as required, and finish the interior so it feels intentional. You’ll want a pan with a drain (where code requires), a dedicated circuit, and a louvered or undercut door for airflow. Even if you only fit a folding station and hampers, a laundry-smart reach-in can unclog the rest of your space.
The point isn’t to add complexity—it’s to align the closet with the life you actually live. When your space supports your routines, everything runs smoother.
A beautiful layout without a maintenance plan will drift. Keep it tight with small rituals:
Labels everywhere. Bin labels make decisions automatic. I “Use attractive bins … label them and keep colors consistent for a cleaner look.”
Seasonal swaps. Twice a year, rotate off-season pieces up high. Edit as you go—one-in, one-out.
Ten-minute resets. Once a week, set a timer: re-fold stacks, re-hang strays, return accessories to trays. The timer makes it painless.
Laundry discipline. Hamper inside the closet = fewer piles elsewhere. If you created that laundry zone, fold right into the drawer stack.
Door check. If you “Go doorless,” your closet is part of the room—make the visuals worth it. If you kept doors, open them fully during resets so you catch blind spots.
Organization is a habit loop. Design for easy put-away and maintenance becomes almost automatic.
What’s the minimum depth for a reach-in?
Around 24 in is the comfortable standard so hangers and shoulders don’t crash into doors or trim. Shallower niches can work with front-to-back hanging or all-shelf layouts.
Should I choose sliding, bi-fold, swing, or pocket doors?
Pick based on room clearance and how you access the closet. Sliding saves floor space but blocks half the opening; swing and bi-fold give broader access; pocket is ideal if you’re renovating.
Is painting the interior too dark a mistake?
Not if you balance it with lighting. A bold interior—even black—adds depth and makes accessories pop. Pair with 3000–3500K LEDs and you’re golden.
DIY or custom?
If your closet is a straight, standard run, modular DIY is a great value. Go semi-custom or custom for tricky walls, deep corners, or when you want integrated drawers and a furniture-grade finish.
How do I keep it organized long-term?
Design for easy put-away (drawers where you stand, bins at arm’s reach), label everything, and do 10-minute weekly resets. That’s the whole game.